Upon project creation in Eclipse, the plugin development can be started. Plugins are typically implemented in accordance with the following steps:
Definition of the plugin task.
Implementation of the com.semture.ecoube.plugin.Action interface.
Implementation of the com.semture.ecoube.plugin.ToolbarButton and/or com.semture.ecoube.plugin.MenuItem interface.
Implementation of the com.semture.ecube.plugin.Plugin interface.
Code deployment.
Validity check.
The figure 2 shows a class structure diagram for the plugin to be developed.

Those considerations show that the plugin uses elements of the Cubetto-API. At the first instance level, the com.semture.ecube.plugin package is interesting for the implementation of a plugin.
The complete source code for the plugin to be developed can be downloaded here. Follow the steps hereafter to include the code in your development environment:
Unpack the archive into a file in the Eclipse-workspace.
Create a new project and name it "Plugin".
The unpacked project is automatically recognised by Eclipse when the dialog is closed.
As the reference to
ecube_classes.jaris still inaccurate, the project cannot be compiled yet. Edit the path of the .jar data file under Project->Properties->Java Build Path -> Libraries (see Figure 1). The project will be compiled properly.
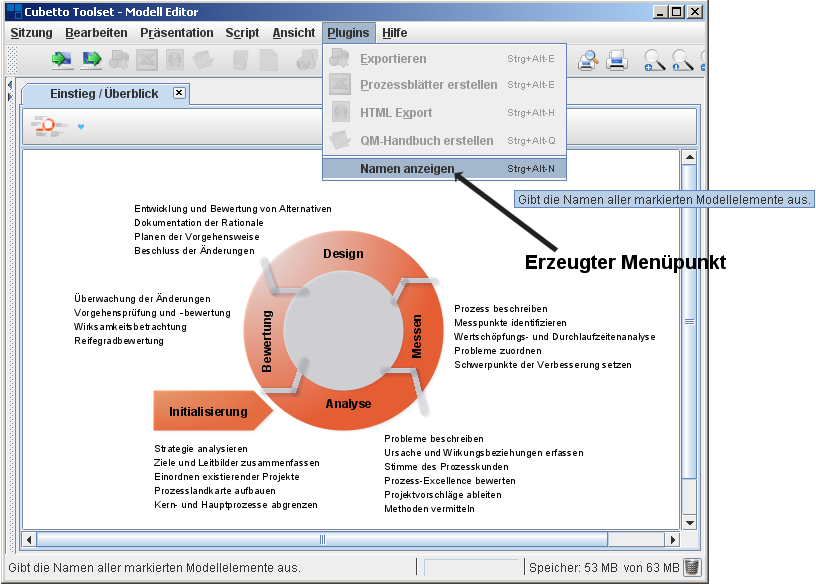
For this introducting example, the names of all selected model items should be displayed in a window. The plugin activation takes place when clicking a button on the toolbar and entering a record in the model editor menu. When clicking the button or the menu, a dialog displaying the names of all items selected in the model editor appears.
A plugin action is triggered by the implementation of the action
interface. This interface is a starting point for the implementation of the
plugin content. The action interface requires in turn the implementation of
a series of methods. To begin with, the action itself needs to be defined,
the methods getName(),
getToolTip() and getHelp()
can thereby be used. Each function returns strings that indicate the name
and tooltip of the action. The name of the action is used within the tool to
manage the plugins. A tooltip is displayed when the mouse cursor is over the
appropriate menu item or toolbar button. From now on, tooltips will be
displayed in a separate help window. They should therefore be returned as
HTML-text.
The function getKeyStroke() allows to define
a hotkey linked to that action. Upon creation of a corresponding menu item,
the shortcut is activated, and the hotkey is implemented into the menu item
description.
CAUTION: Should a key be double-assigned, the first assignment will remain valid. The implementation of the action interface can therewith be started:
/**
 * @return
 *   Namen of the action.
 */e
public String getName() {
    return "Element names";
}

/**
 * @return
 *   Tooltip of the action.
 */
public String getTooltip() {
    return "Shows the name of all selected model elements.";
}

/**
 * @return
 *   Help content of the action.
 */
public String getHelp() {
    return "<html>Shows the name of all selected model elements. " +
        "The action is available only, when at least one element is selected.</html>";
}

/**
 * @return
 *   The key stroke.
 */
public KeyStroke getKeyStroke() {
    return KeyStroke.getKeyStroke('N', InputEvent.ALT_MASK + InputEvent.CTRL_MASK);
}
It is recommended to the constructor of the action class to save the reference to the relevant object that he/she has got. This object is an instance of the class, which implements the plugin interface (see frame below). The reference can be used lateron to exchange data between both objects:
/**
 * The related plugin.
 */
private MyPlugin plugin;

/**
 * Constructor.
 *
 * @param plugin
 *   The plugin, we belong to.
 */
public MyPluginAction(MyPlugin plugin) {
    this.plugin = plugin;
}
A further description of the action is based on the transaction
concept of Cubetto Toolset. If a plugin is to be executed during a
transaction, the method isTransactional() has to
yield "true". In this case, the plugin runs in its own transaction. If the
run() method (cf. below) runs faultless, the
transaction will be completed with a commit(). If
run() is interrupted by an exception, the current
transaction will roll back and all actions taken by the plugin will be
discarded.
IMPORTANT: All plugins, which modify the existing model data have to
be run in own transactions, so that
isTransactional() yields "true". The
getTransactionDescription() method will indicate
the string, which describes the transaction (or more precisely the save
point) upon its completion.
getTransactionDescription() can only yield null if
the plugin does not need to be run in a transaction.
As the plugin to be implemented only has a read access to the Cubetto
Toolset data, the transaction concept is not required. This taken into
account, isTransactional() and
getTransactionDescription() can be implemented as
indicated below:
/**
 * @return
 *   false.
 */
public boolean isTransactional() {
    return false;
}

/**
 * @return
 *   an empty string.
 */
public String getTransactionDescription() {
    return "";
}
The actual task of the plugin is implemented into the
methods Run() and run().
The canRun() method yields "true" if the execution
of the plugin is allowed. In this case, the linked toolbar and menu items
are activated. Therewith, the validity of the plugin code depends on
specific conditions, e.g. the selection of model items in the model editor.
The run() method is run as soon as the user clicks
the toolbar or appropriate menu item.
The plugin code validity should be provided as soon as at least one model item is selected. The items currently selected are saved in the SelectionManager that is directly sent to the plugin during the initialization (see below). The access to the SelectionManager is provided by the link to the plugin interface:
/**
* @return
* true, if at least one element has been selected.
*/
public boolean canRun() {
return !plugin.getSelectionManager().deriveE3Objects().isEmpty();
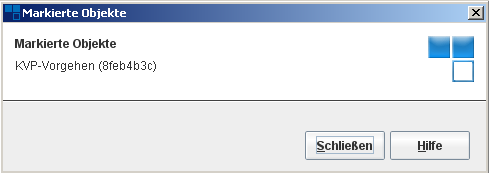
}The last step consists in implementing the
run() method that in turn determines the actual
plugin functionality. In agreement with the task definition, the selected
items are displayed as strings in a dialog box, using the
ScriptHelper that provides windows for simple data
input and output. The implementation is described in the following
frame:
/**
 * Starts the plugin and shows the name of the selected elements.
 */
public void run() {
    //  ScriptHelper and NameResolver helps us here
    ScriptHelper.showInformation(
        "Selected Elements",
        NameResolver.getNames(plugin.getSelectionManager().deriveE3Objects()));
}At this step, the question arises, how the plugin should be integrated
into the modeling tool. Two alternatives are possible: display a button on
the model editor toolbar or display a menu item in the menu editor plugin
menu. Of course, both alternatives can be implemented in parallel. The
MenuItem-Interface, to begin with, works as follows: in Java, a menu item is
defined by its name, its hotkey within the menu (mnemonics represented as
underlined characters) as well as its icon. Accordingly, the methods
getText(), getMnemonic()
and getIcon() need to be implemented:
/**
 * @return
 *   Text of the menu item.
 */
public String getText() {
    return "Show names";
}

/**
 * @return
 *   The short key to the menu item.
 */
public char getMnemonic() {
    return 'N';
}

/**
 * @return
 *   Image icon of the menu item.
 */
public ImageIcon getIcon() {
    return new ImageIcon("Filename");
}
Cubetto Toolset also features a group concept. A group is a number of
menu items that belong together, separated from each other by a horizontal
line, a so-called separator. The groups are defined with the function
getGroup. It is important to note that group numbers can be already used by
other plugins, consequently, menu items of the relevant plugin can be
assigned according to the structure of other plugins. The function
getIndex()is used to determine the position of
items within their groups:
/**
 * @return
 *   The Group, that menu item belongs to.
 */
public int getGroup() {
    return 1;
}

/**
 * @return
 *   Index of the menu item with the group.
 */
public int getIndex() {
    return 1;
}
Menu items are sorted in the Model Editor in ascending group order and within their group according to their index number. IMPORTANT: should a group number and an index number be double-assigned, only one menu item will be displayed in the plugin menu. IMPORTANT: gaps in the group and index number sequences are allowed, as a consequence, it is recommended to use one's own numbering (e.g. numbers over 1000), thereby reducing the risk of having to share it with other users.
Finally, one needs a plugin action linked to the menu item. This
action is returned by getAction()(see above). It is
recommended to pass the action to the constructor when initializing the menu
item.
/**
 * Related action.
 */
private Action action;

/**
 * Creates an object and stores the related action.
 *
 * @param action
 *   The action that is related to that menu item.
 */
public MyPluginMenuItem(Action action) {
    this.action = action;
}

/**
 * @return
 *   The actio nof the menu item.
 */
public Action getAction() {
    return action;
}
The implementation of a button in the toolbar
(ToolbarButton-Interface) takes place in a similar way. A ToolbarButton is
characterized by its icon, which is returned by
getIcon(). The above-mentioned group concept also
exists for ToolbarButtons. This involves the implementation of
getGroup() and getIndex().
getAction() yields in turn the action linked to the
ToolbarButton described above. The following frame contains a short
example.
/**
 * Related action.
 */
private Action action;

/**
 * Creates an object and stores the related action.
 *
 * @param action
 *   The action that is related to that button.
 */
public MyPluginToolbarButton(Action action) {
    this.action = action;
}

/**
 * @return
 *   Image icon of the button.
 */
public ImageIcon getIcon() {
    return new ImageIcon("Filename");
}

/**
 * @return
 *   The action of the button.
 */
public Action getAction() {
    return this.action;
}

/**
 * @return
 *   Group, this button belongs to.
 */
public int getGroup() {
    return 1;
}

/**
 * @return
 *   Index within the group.
 */
public int getIndex() {
    return 1;
}The embedding of the plugin in Cubetto Toolset requires as a last step
the implementation of the plugin interface. The methods
getAuthor(), getName(),
getVersion() and
getDescription() do not require any explanation.
The implementation yields strings as illustrated in the following
frame:
/**
 * @return
 *   Versionnumber of the Plugins.
 */
public String getVersion() {
    return "0.1";
}

/**
 * @return
 *   Author of the plugin.
 */
public String getAuthor() {
    return "Max Mustermann";
}

/**
 * @return
 *   Name of the plugin.
 */
public String getName() {
    return "Testplugin";
}

/**
 * @return
 *   Description of the plugin.
 */
public String getDescription() {
    return "Shows the names of selected model elements.";
}
Furthermore, the plugin implementation can contain a
parameterless constructor that initializes local variables. The example
below illustrates how the constructor initializes the action that is to be
run by the plugin. The initialization can also be triggered with
init():
/**
 * Related action.
 */
private Action action;

/**
 * Creates a plugin and the only action.
 */
public MyPlugin() {
    action = new MyPluginAction(this);
}
In the next step, the menu and toolbar items need to be linked to the
plugin. The methods getMenuItems() and
getToolbarButtons()can be used to do so. Each
method returns several menu and toolbar items. Those will later be sorted
thanks to getGroup() and
getIndex() provided by the MenuItem-Interface and
the ToolbarButton-Interface (see above):
/**
 * @return
 *   The available menu items.
 */
public Collection<? extends MenuItem> getMenuItems() {
    Collection<MenuItem> result = new ArrayList<MenuItem>();
    result.add(new MyPluginMenuItem(action));
    return result;
}

/**
 * @return
 *   The available buttons.
 */
public Collection<? extends ToolbarButton> getToolbarButtons() {
    Collection<ToolbarButton> result = new ArrayList<ToolbarButton>();
    result.add(new MyPluginToolbarButton(action));
    return result;
}
Finally, init() and
selectionHasChanged() need to be implemented. The
first method is called upon plugin activation and passes important
parameters to the plugin. These parameters include the session where the
plugin is currently run as well as links to the main frame and to the
SelectionManager that manages the items selected in
the Model Editor.
The reference to the session is important for transaction plugins, e.g. to execute an action in a secondary transaction or to rollback a transaction. The link to the main frame is crucial to plugins running with a window system. Those plugins should use the main frame object as parent frame when implementing modal dialogs.
In the example shown, the only interesting reference in the
SelectionManager is the one saved in the object from
the class MyPlugin and which can be returned by
getSelectionManager() if required:
/**
 * Selection Manager is needed to access the selected model elements.
 */
private SelectionManager selectionManager;

/**
 * Constructor.
 *
 * @param session
 *   not interesting here.
 * @param mainFrame
 *   not interesting here.
 * @param selectionManager
 *   used to access the selected model elements.
 */
public void init(Session session, JFrame mainFrame, SelectionManager selectionManager) {
    this.selectionManager = selectionManager;
}

/**
 * @return
 *   the selection manager.
 */
public SelectionManager getSelectionManager() {
    return selectionManager;
}
selectionHasChanged() is the last method to
be implemented. It is activated as soon as a selection in the Model Editor
is modified. As a result, the plugin output can directly depend on a
selection, or a change in a selection in the Model Editor. As this method is
not necessary in the present example, it remains blank:
/**
 * Invoked, when model elements are selected / deselected.
 *
 * @param oldSelection
 *   Old Selektion
 * @param newSelection
 *   New Selektion
 */
public void selectionHasChanged(Collection oldSelection, Collection newSelection) {
    // Will not be handled here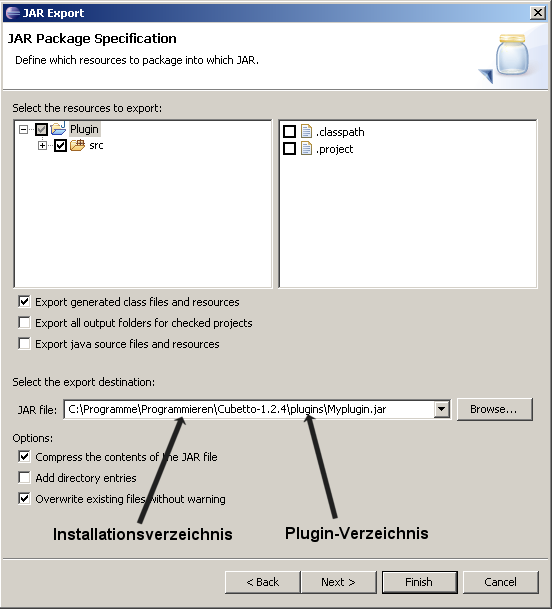
}A plugin needs to be saved in the plugin directory of Cubetto Toolset
(Cubetto Toolset/plugins) to be activated. If it has to
be available to all computer users, the plugin needs to be saved into the
plugin folder of the Cubetto installation, otherwise it can be saved in the
home directory (~/cubetto.workspace/plugins).
Eclipse enables an easy deployment by exporting the compiled classes as .jar-file: